

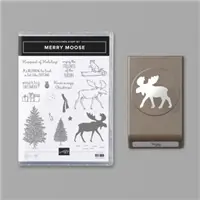
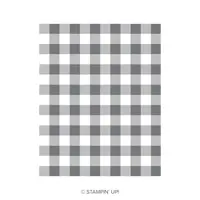
Ever since I spotted that adorable Merry Moose Bundle (item 153015) in the 2019 Holiday Catalog, I just knew I had to pair it with the Buffalo Check Background Stamp (item 147794). I started creating my banner by using the Buffalo Check Stamp along with the Stamparatus (item 146276) to stamp Sahara Sand Classic Ink (item 147117) onto a piece of Sahara Sand Cardstock (item 121043). I trimmed the image to size and cut into 3 even pieces, flagging the end with the Banner Triple Punch (item 138292).

I then used Gold Foil Sheets (item 132622) that were scored/folded in the middle to adhere the flagged banners to a 4 ft (merry) and 5 ft (Christmas) piece of Gold 3/8” Metallic Edge Ribbon (item 144146) with Tear & Tape Adhesive (item 138995).
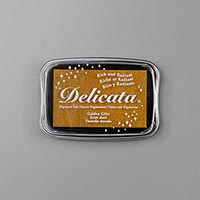
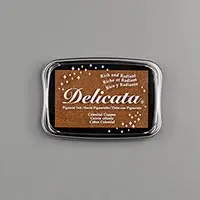
I distressed the edges of the flagged banner pieces using a Stamping Sponge (item 141337) and the Delicata Golden Glitz Ink Pad (item 150711) I then cut 16 pieces of Gold 3/8” Metallic Edge Ribbon to adorn the space between each flagged banner. I secured them in place with a Mini Glue Dot (item 103683) and a bow of Linen Thread (item 104199).
I used the Lined Alphabet Stamp Set (item 145908) to stamp the “Merry Christmas” in Versamark Ink (item 102283) onto Gold Foil Sheet pieces. I I then covered with Clear Stampin’ Emboss Powder (item 109130) and set with a Heat Tool (item 129053). I snipped them out with Paper Snips (item 103579) and adhered them to the flagged banner pieces with Mini Stampin’ Dimensionals (item 144108).

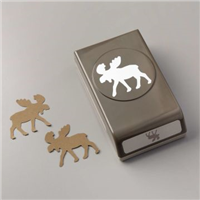
The Gold Foil Sheets, Sahara Sand Cardstock and Ink, as well as the Simply Scored Scoring Tool (item 122334), were used to create the rosettes that enhanced the ends of the banner. A ½” Circle Punch (item 138299) created the Gold Foil circle that covers the center of the rosette. The moose were stamped in Tuxedo Black Memento Ink (item 132708) and Delicata Golden Glitz Ink, then cropped with the coordinating Moose Punch (item 150652). The tree was also stamped with Tuxedo Black Memento Ink, then was snipped with Paper Snips. A double bow of Linen Thread was added to the tree for a final touch.

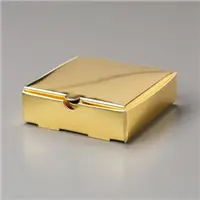
My trio of Gold Mini Pizza Boxes (item 152068) were all given a rustic makeover by adding a bit of distressing in three different ways, each way is explained below. Each Mini Pizza Box was adorned with a Gold Foil tag created with the Delightful Tag Topper Punch and Detailed Trio Punch (corner rounder). The moose, sentiments, and trees were all stamped and created using the same steps as those used to create the rosettes (above). All tags were topped with a piece of Gold 3/8” Metallic Edge Ribbon and a bow of Linen Thread.

My 1st Gold Mini Pizza Box was distressed with a sand block to remove the glossy finish. It then paired well with bits of Gold Foil Sheets and a square of Sahara Sand Buffalo Check. The finishing touches were added via Gold Metallic Pearls (item 146282).

My 2nd Gold Mini Pizza Box was again distressed with a sand block to remove the glossy finish. I then stamped it with the Buffalo Check Background stamp using Versamark Ink and setting the Clear Stampin’ Emboss Powder with a Heat Tool. The moose was attached to a rosette created from a Gold Foil Sheet.

My 3rd Gold Mini Pizza Box was distressed by using a Stamping Sponge to liberally add Delicata Celestial Copper Ink (item 150707) and Soft Suede Ink (item 147115) to it. I then covered it completely with Clear Stampin’ Emboss Powder and set it with a Heat Tool, giving it a brassy finish.
Which do you love the most? I hope I have inspired you to create yourself some country-themed/rustic Christmas Décor with phenomenal Stampin’ Up! Products.

Place an online store order valued at $50 or more (before shipping and tax), enter the host code YMU6WBKF and you will earn YOUR CHOICE of ANY Current Item valued at $10 or less!
Click on the image below, it takes you right to my store so you can begin shopping NOW!

THREE IS BETTER THAN ONE! Become a part of Stampin’ Up!, The Hootenannies, & Mary Fish’s Pals Stamping Community!
- Purchasing the starter kit! Joining Stampin’ Up! includes access to exclusive Stampin’ Up! ideas and resources!
- Purchasing the starter kit and joining through me includes access to the Hootenannies AND the Stampin’ Pretty Pals Pals private Facebook groups and community. Immerse yourself at any level you like in daily stamping discussion, prizes, polls, ideas and inspiration, recognition, friendship, and fun!

Want the Ultimate Bundle, the best deal? During the month of July & August, get $155 worth of product for just $99+ tax and FREE Shipping! Then save 20-25% on future purchases, with no obligation to buy, sell or stay active…do it for the discount and for you!

Have a Hoot-a-Riffic Day!


So Beautiful!