

I always have the best intentions to use all my supplies on hand…I mean, why else would you buy them, right? LOL!
I have a lot of specialty papers in my stash that never get the love they deserve, so I decided to give some love and attention to the Red & Gold Foil Sheets (Item 153510) from the 2020 August – December Mini Holiday Catalog!


Slimline cards are all the rage right now and I absolutely love the look…but they can be tricky to design and fill up. I create the size that I want, regardless of whether it fits in a #10 envelope.
This one is a tad smaller than a “standard” slimline.

Use a Stampin’ Up! Paper Trimmer to cut a piece of Whisper White Thick Cardstock to 6 3/4 x 8. Score and fold at 3 1/2.
Cut a piece of Green and a piece of Red Foil to 8 x 1/2. Adhere to the bottom of the card stacked as shown.
Crop several circles of Green and Red Foil using a Stampin’ Cut & Emboss Machine, along with the following dies:
- Layering Circle Dies (Smaller Sizes)
- Playful Alphabet Dies (O & 9)
- Wreath Builder (Circle)
Adhere and trim as shown with Stampin’ Seal, Mini Glue Dots & Stampin’ Dimensionals.
Use the Stampin’ Cut & Emboss Machine to crop the three layers of “Bright” in Whisper White, Green & Red Foil.
TIP: Adhere the Red Foil to an Adhesive Sheet prior to cropping it so that it can easily be adhered to the Green Foil.

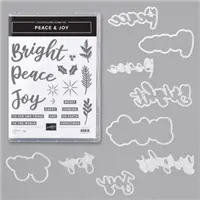
PEACE & JOY BUNDLE
The Peace & Joy Bundle includes the Peace & Joy Stamp Set and the Joy Dies.
PEACE & JOY PHOTOPOLYMER STAMP SET
Send your warmest Christmas wishes with handmade cards you make using the Peace & Joy Stamp Set. This set has the words to say what you’re feeling. Add any images from your favorite stamp sets to finish off your cards.* 19 photopolymer stamps
JOY DIES
Create die-cut words using the Joy Dies.These dies include the words “Joy,” “Peace,” and “Bright.” Use them on handmade cards, scrapbook pages, and other projects. They’re perfect for Christmastime but you’ll find uses for them all year long.* 9 dies * Largest die: 3-7/8″ x 1-7/8″

")
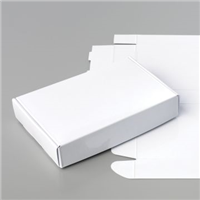
Mini Paper Pumpkin Boxes, as well as Mini Pizza Boxes, are a quick and easy way to create a personalized or coordinating gift box for any occasion.
Begin by assembling a Mini Paper Pumpkin Box.
Adhere a 5 1/4 x 3 1/2 piece of Red Foil to the box with Stampin’ Seal+.
Crop several circles of Green and Red Foil using a Stampin’ Cut & Emboss Machine, along with the following dies:
- Layering Circle Dies (Smaller Sizes)
- Playful Alphabet Dies (O & 9)
- Wreath Builder (Circle)
Adhere and trim as shown with Stampin’ Seal, Mini Glue Dots & Stampin’ Dimensionals.
Use the Stampin’ Cut & Emboss Machine to crop the three layers of “Bright” in Whisper White, Green & Red Foil.
TIP: Adhere the Green Foil to an Adhesive Sheet prior to cropping it so that it can easily adhere to the Red Foil.
Stamp the “merry’ & “and” sentiments in Garden Green Ink onto a piece of Whisper White Cardstock. Immediately cover with Clear Stampin’ Emboss Powder, tap to remove the excess and set with a Heat Tool. Repeat if needed.
Snip to size with Paper Snips, adhere as shown with Mini Stampin’ Dimensionals.

During the month of AUGUST, place an online store order valued at $50 or more (before shipping and tax), enter the host code NMNT7MXH and you will earn YOUR CHOICE of ANY Current Item** valued at $10 or less!
**EXCLUDES THE FOLLOWING ITEMS:
- ALL 12 x 12 Designer Series Paper
- NOTE: If you are ok with it cut to 6×6 pieces, then Designer Series Paper can be selected as your FREE item.
- ALL Large Grid Papers
- SORRY! They cost too much to ship!
NOTE: FREE Hoot Loot is shipped separately from your order. It should arrive mid-month following the month is earned.


Click on the image above, it takes you right to my store so you can begin shopping NOW!

THREE IS BETTER THAN ONE! Become a part of Stampin’ Up!, The Hootenannies, & Mary Fish’s Pals Stamping Community!
- Purchasing the starter kit! Joining Stampin’ Up! includes access to exclusive Stampin’ Up! ideas and resources!
- Purchasing the starter kit and joining through me includes access to the Hootenannies AND the Stampin’ Pretty Pals Pals private Facebook groups and community. Immerse yourself at any level you like in daily stamping discussion, prizes, polls, ideas and inspiration, recognition, friendship, and fun!

Have a Hoot-a-Riffic Day!


I wonder if you have a suggestion to prevent foils from marring and/or losing luster while running them through die machine. I love these colorful foils! Beautiful work!
Thanks, Ivy! My suggestion is to use a clean top plate and to cut the foil almost to the size of the die, close to the edge. Does that make sense?
I think you did an awesome job showing the red and green foils some love. Did you use a thin sheet of tracing paper over foil when die cutting?
Thanks, Ann! I did not use anything over the foil, I did use a clean top plate and I cut each piece pretty close to size before running it through the machine.