
Stampin’Up! Artisan Design Team Blog Hop – Forever Lovely

Welcome to the 1st Artisan Blog Hop of 2019!
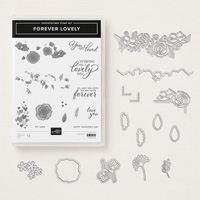
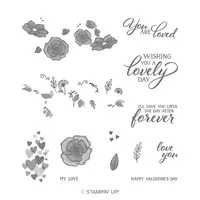
I am so excited to welcome you to the very first blog hop of the Stampin’ Up! 2019 Artisan Design Team! I hope that you take the time to check out all 16 blogs! There are so many AMAZING projects to inspire you featuring the Forever Lovely Bundle, part of the All My love Suite of Products from the 2019 Occasions Catalog!

If this is your first time stopping by my blog, I truly want to thank you for being here! I am so very honored. I do my best to provide inspiration as well as step-by-step instructions to my creations so that you can make them too! You can view my PDF Tutorial Library Here. You can also subscribe to my Newsletter and Blog Updates so you don’t miss out on future posts!

Step-by-Step Instructions:
- With a Stampin’ Trimmer, cut a piece of Whisper White Thick Cardstock to 4 1/4″ x 11″. Score and fold at 5 1/2″.
- Cut a piece of All My Love Designer Series Paper to 4 1/8″ x 5 3/8″. Adhere to the card base with Snail Adhesive.
- Cut a piece of Whisper White Cardstock to 3 1/4″ x 5 1/4″. Create a 1/4″ flagged end by marking at 1 5/8 in (center) and 1/4″ up ( from bottom). Cut from the outside edge to the mark with a Paper Snips or Stampin’ Trimmer.
- Use a Stamparatus to
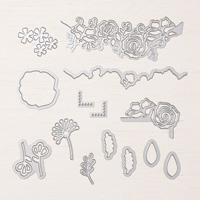
line-up (3/4″ from the top) and stamp the floral border image (Lovely Lipstick) and the coordinating greenery image (Soft Sea Foam). - Use the Big Shot to crop the heart (Be Mine Stitched Framelits Dies) from the flagged piece as shown. Using the same die, crop a piece of Vellum Cardstock. Adhere on the right and left side with Mini Stampin’ Dimensionals.
- Adhere a 4 1/8″ piece of Lovely Lipstick ribbon to the top of the flagged piece. Add the Flirty Flamingo 1/8″ ribbon (All My Love Ribbon Combo Pack) and stitched together with a sewing machine.
- Use the Big Shot to crop a piece of Whisper White Cardstock to outline the top floral image. Snip the edges so they are flush with the flagged piece and adhere with snipped-to-size Mini Stampin’ Dimensionals.
- Stamp the “Wishing You…” sentiment in Versamark Ink onto Whisper White Cardstock that has been rubbed with an Embossing Buddy. Cover with Lovely Lipstick Stampin’ Emboss Powder, flick to remove the excess, set with a Heat Tool. Snip closely with a Paper Snips. Adhere with Stampin’ Dimensionals.
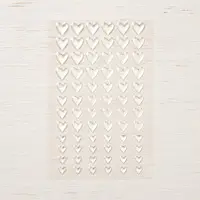
- Add three Multi-Sized Heart Epoxy Droplets for the final touch!

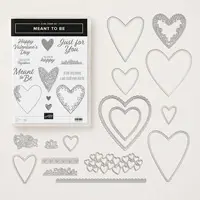
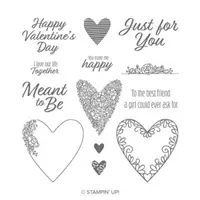
I absolutely love the Forever Lovely Bundle as well as the coordinating Meant to Be Bundle. The Be Mine Stitched Framelits Dies nest together to create a gorgeous result. Add your final touches with the All My Love Ribbon Combo Pack and Heart Epoxy Droplets.

Click on the image above to view the All My Love Suite of Products in my online store!
The All My Love 12×12 Designer Series Paper is the perfect canvas to create those amazing Valentine’s, Wedding, and Anniversary creations that are sure to be loved by the recipient. What is your favorite product from Stampin’ Up!’s All My Love Suite?

That little Mini Pizza Box looked like the perfect 3-D packaging to wrap-up in the All My Love Suite of Products to create a gift box for a valentine. The flowers took a bit of snipping with my handy Paper Snips, but I love the result.

Step-by-Step Instructions:
- Start with a Mini Pizza Box as your creative canvas.
- Cut the following pieces of the All My Love Designer Series Paper: 3 1/4″ Squares, Qty 2; 7/8″ x 3 3/8″, Qty 4. Adhere to the box with Tear & Tape. Use sandpaper to add wear to the edges.
- Use a Stamparatus to line-up and stamp the floral border image (Lovely Lipstick) and the coordinating greenery image (Soft Sea Foam). Flip and adjust the cardstock to stamp it again close to each other. Zip through the Big Shot (two times) with the coordinating edgelit die. Snip the areas that do not cut with a Paper Snips.
- Use the Big Shot to crop two pieces of Whisper White Cardstock (within Multi-purpose Adhesive Sheets) with the coordinating die cut. Lay over the top of the floral image and mark areas that need to be snipped with a Paper Snips. Adhere over the top of the floral image as shown.
- Use the Big Shot and largest Scalloped Stitched Heart Die to crop a piece of Vellum Cardstock. Weave within the floral die cut image you just completed and adhere, with Stampin’ Dimensionals to a belly band created from the All My Love Ribbon (so it can slide on and off the box).
- Create a bow with the Flirty Flamingo 1/8″ Ribbon and adhere with a Mini Glue Dot.
- Stamp the sentiment in Versamark Ink onto a piece of Whisper White Cardstock that has been rubbed with an Embossing Buddy. Cover with Lovely Lipstick Stampin’ Emboss Powder, flick to remove the excess, and set with a Heat today. Snip to size with a Paper Snips. Flag one end with the Tailored Tag Punch. Crop the other end with a Big Shot and scalloped stitched edgelit die (Be Mine Stitched Framelits Dies). Line up and adhere to the stitched heart vellum die-cut.
- Add three Heart Epoxy Droplets for a final touch.

Be sure to click on the buttons below to visit the rest of the Stampin’ Up! 2019 Artisan Design Team to see the entire blog hop line-up and to gain oodles of inspiration for the Forever Lovely Bundle and All My Love Suite of products!

Click on the name of the Artisan below to visit their blog and see what amazing projects they have created to inspire you!
So many great deals are available during Sale-a-Bration, don’t miss out! So much bang for your buck! You can see all the details on my post here: Sale-A-Bration.

Are you ready to shop online? Click on the image above to visit my online store! There are so many new and fabulous items ready for you to add to your crafting collection!
Place an online store order valued at $50 or more (before shipping and tax), enter the host code AHE7WQNK and you will earn YOUR CHOICE of ANY Current Item valued at $10 or less!

Have a Hoot-a-Riffic Day!


Dear Stehsa,
Your projects are wonderful, I love how lovely you put all those parts together, great!
Absolutely BEAUTIFUL Stesha! <3 x
Stesha, such a awesome projects!
Thanks for the inspiration and for the guide!
I’m looking forward to the next artisan blog hop with you!
Hugs from Germany
Gorgeous! What beautiful projects and such a great way to use the vellum – I should die cut with this more often – Hugs xo
Stesha, I love all the added extra details on your projects. I’m sure I could look at it several times and find another subtle yet amazing detail
Well done
Amazing projects, Stesha. So many stunning details in both creations. Wonderful instructions too. Looking forward to sharing this year with you. xOx
Beautiful projects! So very proud of you, my friend!
Gorgeous projects Stesha – love them! Here’s to a fabulous year ahead with you xx
Liebe Stesha, ein paar tolle Projekte hast du da für uns gezaubert! Dankeschön! Liebe Grüße Maike
Thank you Stesha for this perfect jump! I can not wait to see the next projects you are creating this year, for sure, they will be as wonderful as this one. Warmly. Aurélie
I have always been in awe of your fabulous creative vision…and now you have a wonderful platform to share your talent with others…the sky’s the limit!! ❤️
Wow! You have shared such beautiful projects ? I love how you added such intricate detail with embellishments, design series paper and vellum!
Well done! Love it!!!
Such stunning projects Stesha! All the layers and details make for two beautiful projects! Rochelle xo
There is so much gorgeous texture here and I love the romantic feels they have!
Oh Stesha, the detail you have achieved in these gorgeous projects is outstanding. Beautiful projects! So very pleased to be sharing this Artisan year with you. You are so very talented xx
Awesome projects–love all the layers and texture.
All I can say is WOW! This is so lovely!