
")
Welcome to the September 2020 Artisan Blog Hop!
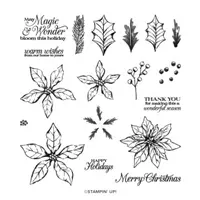
The Stampin’ Up! 2020 Artisan Design Team has so many amazing creations for you to see! I hope that you take the time to check out all 16 blogs! This blog hop will feature two Suite Collections from the August – December Mini Catalog: Trimming the Town Suite | 155105 | $74.25 | Pages 24-26 and Poinsettia Place Suite | 155109 | $94.00 | Pages 14-16
Be sure to check out all 16 blogs as there are so many AMAZING creations using these two beautiful suites.

")
OUR ADVENTURES JOURNAL! This journal really makes the Trimming the Town Designer Series Paper shine! The Designer Series Paper pack really does a fabulous job tying all four of my creations together! The color palette is one of my favorites.
The Trimming the Town Suite does not include sentiments, but you have an extremely large selection of Stampin’ Up! sets that pair perfectly. I used the Playful Alphabet Dies along with the Peaceful Moments Stamp Set to bring this journal to life.

Wrap the binding of a composition notebook with a 2 1/2 x 10 piece of Trimming the Town Designer Series Paper, adhering with Tear & Tape or Multipurpose Liquid Glue.
Adhere two 7 x 10 pieces of Trimming the Town Designer Series Paper to the front and back cover with Tear & Tape or Multipurpose Liquid Glue.
Trim the corners to match the curve of the notebook using Paper Snips.
Cover the seams with Misty Moonlight 1/4″ Twill Ribbon, adhering in place with Tear & Tape Adhesive.
Adhere Poppy Parade Cardstock to Foam Adhesive Sheets. Zip through a Stampin’ Cut & Emboss Machine to crop the Playful Alphabet letters. Remove the protective backing and adhere to the notebook as shown.
Stamp the sentiment (Peaceful Moments) in Versamark Ink onto a piece of Poppy Parade Cardstock. Cover with White Stampin’ Emboss Powder, tap to remove the excess and set with a Heat Tool.
Adhere to a Foam Adhesive Sheet. Zip through a Stampin’ Cut & Emboss Machine to crop with the largest Stitched So Sweetly Die. Remove the protective backing and adhere to the notebook as shown.
Use Paper Snips to cut two large and three small pine trees from the Trimming the Town Designer Series Paper. Adhere to a Foam Adhesive Sheet, then crop with the coordinating Home Together Dies. Remove the protective backing and adhere to the notebook as shown.
Embellish with All the Trimmings Embellishments.

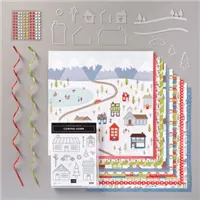
TRIMMING THE TOWN SUITE COLLECTION | Item 155105 | $74.25
Capture the feel of a hometown holiday with the whimsical imagery and coordinating trimmings in the Trimming the Town Suite Collection.
The Trimming the Town Suite Collection includes:
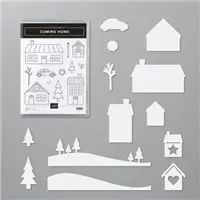
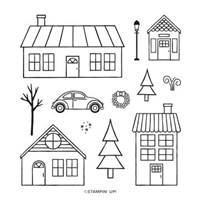
* Coming Home Photopolymer Stamp Set (10% off)
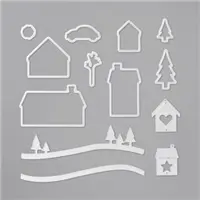
* Home Together Dies (10% off)
* Trimming the Town Designer Series Paper
* All the Trimmings Embellishments
* All the Trimmings Ribbon Combo Pack
Product colors: Early Espresso, Misty Moonlight, Old Olive, Pool Party, Poppy Parade, Whisper White


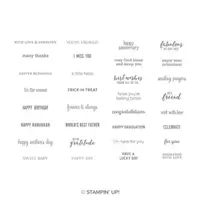
It’s not just for the holidays! The Trimming the Town Suite also works well for a “Congratulations on a New House” card. I used the Itty Bitty Greetings Stamp Set, which has so many options for tiny sentiments!
Begin by using a Stampin’ Up! Paper Trimmer to cut a piece of Whisper White Thick Cardstock to 5 1/2 x 8 1/2. Score and fold at 4 1/4.
Adhere a 5 x 2 piece of Trimming the Town Designer Series Paper with Stampin’ Dimensionals.
Stamp the “congratulations” sentiment as shown with Tuxedo Black Memento Ink onto a 4 1/8 x 3 piece of Whisper White Cardstock.
Adhere to a 4 1/8 x 3 piece of Misty Moonlight and to the card as shown with Stampin’ Dimensionals.
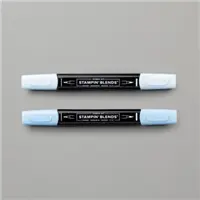
Stamp all images in Tuxedo Black Memento Ink onto Whisper White THICK Cardstock. Color with Stampin’ Blends: Mossy Meadow, Old Olive, Soft Suede, Smoky Slate, Pool Party, Poppy Parade, Seaside Spray, and a Color Lifter.
Crop with the coordinating Home Together Dies.
Adhere together and to the card as shown with Stampin’ Seal and Stampin’ Dimensionals.

SLIMLINE SPLENDOR! I love slimline cards, they are so fun to make especially when creating a scene. I immediately imagined a slimline card when I saw the dies that came in the Home Together Set! Have you tried a slimline card yet? Sometimes they can be a challenge as there is a lot of canvas to cover….but keep them simple and they are not as hard as they look!
I love to make coordinating envelopes! I admit that I hate to measure and cut…so I wrapped the Designer Series Paper around my card, made a few scores on where I needed to fold and cut, then assembled it from there. I will do my best to give good measurements and steps so you can create one too!

")
Use a Paper Trimmer to cut a piece of Whisper White Thick Cardstock to 9 1/2 x 8. Score and fold at 4.
Use a Stampin’ Cut & Emboss Machine, along with the Magnetic Cutting Plate, to crop a 9 1/2 x 3 3/4 piece of Whisper White Thick Cardstock with the Home Together curvy die with trees. It will need to be done in two-steps to cut all the way across.
Stamp the images in Tuxedo Black Memento Ink onto Whisper White Thick Cardstock. Crop with the coordinating Home Together Dies.
Color with Stampin’ Blends: Mossy Meadow, Old Olive, Soft Suede, Smoky Slate, Pool Party, Night of Navy, Daffodil Delight, Mango Melody, Basic Black, and a Color Lifter.
Adhere to the card as shown with Stampin’ Dimensionals and Stampin’ Seal Adhesive.
Stamp the sentiment (Poinsettia Petals) in Versamark Ink onto a piece of Basic Black Cardstock. Cover with White Stampin’ Emboss Powder. Tap to remove the excess. Set with a Heat Tool. Trim to 2 x 5/8. Adhere with Stampin’ Dimensionals.
Embellish with All the Trimmings Embellishments.


ENVELOPE:
Cut a piece of Trimming the Town Designer Series Paper to 10 x 12.
Score at 3 1/4 and 7 1/2 on the 10″ side. Flip and score at 3/4 and 10 3/4.
Use the Detailed Trio Punch to round the corners of the top and bottom flaps.
Assemble and adhere all but the top flap together with Stampin’ Seal+.
DECOR:
Cut a piece of Trimming the Town Designer Series Paper to 7 3/4 x 3 1/4. Adhere to the front of the envelope with Stampin’ Seal.
Cut a piece of Whisper White Thick Cardstock to 8 1/4 x 2 7/8. Staple a 2″ piece of Misty Moonlight 1/4″ Twill Ribbon to the upper-left corner. Adhere as shown with Stampin’ Seal.
Crop the images from the Trimming the Town Designer Series Paper with the coordinating Home Together Dies along with the help of a Stampin’ Cut & Emboss Machine and a Magnetic Cutting Plate. Adhere as shown with Stampin’ Seal and Stampin’ Dimensionals.
Cut the sentiment from the Trimming the Town Designer Series Paper and adhere with snipped-to-size Stampin’ Dimensionals.
Embellish with All the Trimmings Embellishments.
ENCLOSURE:
Crop two pieces of Trimming the Town Designer Series Paper with the smallest Stitched So Sweetly Die. Adhere to the flap and to the envelope body with Stampin’ Dimensionals.
Adhere two small trees from the Trimming the Town Designer Series Paper to a piece of Foam Adhesive Sheet. Crop with the coordinating Home Together Dies. Remove the adhesive backing and adhere as shown.
Wrap Misty Moonlight/Silver Baker’s Twine around the two for closure.
Which creation is your favorite? Do you have questions on a technique or design? Leave a comment or email me, I am more than happy to help!

Be sure to click on the links below to visit the rest of the Stampin’ Up! 2020 Artisan Design Team to see the entire blog hop line-up and to gain oodles of inspiration for the Trimming the Town and Poinsettia Petals Suite Collections.
The extremely talented Tammy Wilson, Stamp Paper Scissors is next in line. Be sure to check out the fabulous creations she has for you!

Click on the name of the Artisan below to visit their blog and see what amazing projects they have created to inspire you!
Caroline van der Straaten | Visit Her Blog
Helene den Breejen | Visit Her Blog
Lauren Alarid | Visit Her Blog
Manuela Geiswinkler | Visit Her Blog
Marine Wiplier | Visit Her Blog
Martha Groger | Visit Her Blog
Narelle Farrugia | Visit Her Blog
Nina Waldschmidt | Visit Her Blog
Rochelle Blok | Visit Her Blog

DOUBLE HOOT LOOT! During the month of SEPTEMBER, place an online store order valued at $50 or more (before shipping and tax), enter the host code VJ7U4XBR and you will earn YOUR CHOICE of ANY TWO Current Item** valued at $10 EACH or less FOR FREE!
PLEASE DO NOT USE THE HOST CODE FOR ORDERS $150+! YOU AUTOMATICALLY QUALIFY FOR FREE HOOT LOOT, AS WELL AS STAMPIN’ REWARDS!
**EXCLUDES THE FOLLOWING ITEMS:
- ALL 12 x 12 Designer Series Paper
- NOTE: If you are ok with it cut to 6×6 pieces, then Designer Series Paper can be selected as your FREE item.
- ALL Large Grid Papers
- SORRY! They cost too much to ship!


AVAILABLE NOW! The STANDARD Stampin’ Cut & Emboss Machine (Item 149653, $120), along with the optional Magnetic Platform (Item 149656, $24) are available for customer purchase!
So what sets the Stampin’ Cut & Emboss machines apart from the rest? Here are some favorite features:
- Durable machine with high-quality results. Solid steel construction frame and rubber feet. Produces crisp, clean, precise cutting and beautifully detailed embossing.
- Easy to use. The machine and tools are designed for an intuitive die-cutting and embossing experience. For example, all plates are labeled with a number and are color-coded for easy reference and use when building your sandwich. And just like the name suggests, Stampin’ Up! Magnetic Cutting Plates have fully-magnetic surfaces to make it easy to securely position your dies and keep them in place.
- Simple to store. The platform folds for space-saving storage and the clean design suits any crafting space.
- Portable. You can use the machine on the go with its folding platform and ergonomic carrying handle. Great for those who like to attend crops or other crafting get-togethers.
- ALL THE DETAILS! Click here to view and print a document with details of the new machine!


GET & GO STARTER KIT PROMOTION & BONUS PRODUCTS! SEPTEMBER 1-30, 2020!
TIP: YOU CAN ADD THE NEW STAMPIN’ CUT & EMBOSS MACHINE (OR YOUR CHOICE OF UP TO $125 IN PRODUCTS) TO A $99 STARTER KIT. YOU’LL SAVE UP TO $26 PLUS RECEIVE THE GET & GO FREE BONUS PRODUCTS! THE KIT SHIPS FREE!
- In addition to the regular starter kit (for $99 you choose $125 worth of products) you will also receive:
- Enough card stock pieces to make 16 cards,
- A pack of Rhinestone Basic Jewels,
- So Much Love stamp set, and
- Queen Anne’s Lace stamp set!
- The kit ships FREE!
- 8 packs of precut card stock of the coastal cabana pack will be provided, and 8 packs of precut cardstock of the Granny Apple Green pack, for a total of 16 cards (packs include envelopes).
- Coastal Cabana card pack contents
2-1/4″ x 3-1/2″ (5.7 x 8.9 cm) Whisper White Cardstock
2-3/4″ x 4″ (7 x 10.2 cm) Daffodil Delight Cardstock
3″ x 4″ (7.6 x 10.2 cm) Bermuda Bay Cardstock
8-1/2 x 5-1/2″ (21.6 x 14 cm) Coastal Cabana Cardstock
5-3/4″ x 4-3/8″ (14.6 x 11.1 cm) Whisper White Envelope - Granny Apple Green card pack contents
8-1/2″ x 5-1/2″ (21.6 x 14 cm) Granny Apple Green Cardstock
3″x 4″ (7.6 x 10.2 cm) Bermuda Bay Cardstock
3″x 4″ (7.6 x 10.2 cm) Coastal Cabana Cardstock
3/4″x 4″ (1.9 x 10.2 cm) Daffodil Delight Cardstock
5-3/4″ x 4-3/8″ (14.6 x 11.1 cm) Whisper White Envelope
- Coastal Cabana card pack contents
CLICK HERE TO READ ABOUT ALL THE BENEFITS OF JOINING THE STAMPIN’ UP! COMMUNITY!

The Stampin’ Up! Clearance Rack was JUST REFRESHED with oodles of additional products. You’ll discover lovely die sets, punches, embellishments, pretty paper, ribbon, ink and more with BIG discounts. Discounted products sell quickly and are ONLY AVAILABLE WHILE SUPPLIES LAST.
SHOP the clearance rack thru me now by clicking here! Please don’t delay if you don’t want to miss out on your favorites.

Have a Hoot-a-Riffic Day!


Superb work, Stesha. Love the new house card, especially.
Your projects are sooooo adorbs, Stesha! Love the journal!!!