

You may remeber last Wednesday I shared that cute bunny card for the Pals Blog Hop! I tried to share all three of these, but just couldn’t pull it off with everything I had going on. So here goes, what do you think? Which one do you like best? I think my favorite is that cute little lamb.

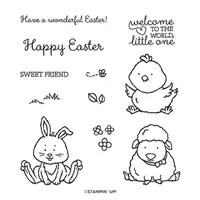
Welcome Easter and new little ones with the Welcome Easter Cling Stamp Set. A baby chick, a bunny, and a lamb would look sweet on any spring-themed project. Greetings include sentiments for Easter projects and cards for new babies. Line art images are great for basic stamping techniques; color and customize them using any of our coloring tools!

So I made a few small updates to the bunny card and followed that through to the other two. I added the Whisper White flower cropped by the Small Bloom Punch, which can be earned for FREE with a qualified $100 purchase during Sale-A-Bration (ends March 31 or While Supplies Last).
I also added a bit of bling with Pearls! I love how those little changes really improved the look of the card!

Cut a piece of Whisper White Thick Cardstock to 4 1/4 x 11. Score and fold at 5 1/2.
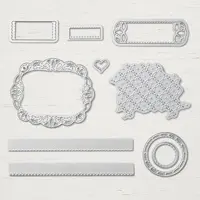
Crop a piece of Blushing Bride Cardstock using a die-cutting and embossing machine and one of the Stitched So Sweetly scalloped rectangle dies. Cut to 2 in wide and adhere to the card base as shown.
Use a Paper Trimmer to cut a piece Whisper White Cardstock to 3 3/4 x 5. Adhere to a 3 13/16 x 5 1/16 piece of Blushing Bride Cardstock with Snail Adhesive. Zip through a die-cutting and embossing machine tucked inside the 3D Subtle Embossing Folder.
Use the Medium Daisy Punch to crop notches 3/4″ in from the left, on both top and bottom of the embossed pieces. Double wrap with Whisper White Solid Baker’s Twine that has been separated to two threads, securing with a bow.
Crop a flower using the Small Bloom Punch. Curl the petals in with a Bone Folder. Adhere with a Mini Stampin’ Dimensional.
Add elements of Blushing Bride Cardstock and 6 x 6 Designer Series Paper to the upper left corner as shown.
Cut a 3/8 x 2 3/16 piece of Blushing Bride 6 x 6 Designer Series Paper and adhere it to a piece of Whisper White Cardstock that has been cropped with the largest Stitched So Sweetly label die. Stamp the sentiment in Tuxedo Black Memento Ink as shown. Adhere to the card with Stampin’ Dimensionals.
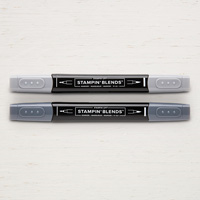
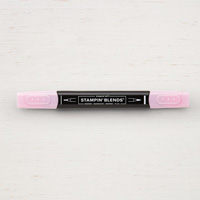
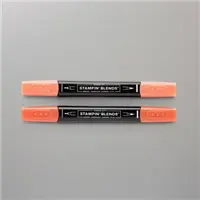
Stamp the bunny in Tuxedo Black Memento Ink onto Whisper White Thick Cardstock. Color with the following Stampin’ Blends: Light & Dark Smoky Slate, Light & Dark Flirty Flamingo, Color Lifter. Snip with Paper Snips and adhere as shown with Stampin’ Dimensionals.
Color a Pearl Basic Jewels with a Light Flirty Flamingo Stampin’ Blend. Adhere as shown.

Cut a piece of Whisper White Thick Cardstock to 4 1/4 x 11. Score and fold at 5 1/2.
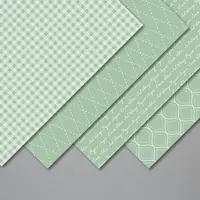
Use the dies from the Stitched Be Mine and Stitched Labels to crop pieces of gingham Smoky Slate 6 x 6 Designer Series Paper (left side 4″ long, upper left flag 7/8″ long, heart, below Easter 5/8″ wide, bottom right full die width cut in half) . Adhere them as shown with Snail Adhesive and Stampin’ Dimensionals.
Use a Paper Trimmer to cut a piece Whisper White Cardstock to 3 3/4 x 5. Adhere to a 3 13/16 x 5 1/16 piece of Smoky Slate Cardstock with Snail Adhesive. Zip through a die-cutting and embossing machine tucked inside the 3D Subtle Embossing Folder.
Use the Medium Daisy Punch to crop notches 3/4″ in from the left, on both top and bottom of the embossed pieces. Double wrap with Whisper White Solid Baker’s Twine that has been separated to two threads, securing with a bow.
Crop a flower using the Small Bloom Punch. Curl the petals in with a Bone Folder. Adhere with a Mini Stampin’ Dimensional.
Crop a piece of Whisper White Cardstock with the largest Stitched Labels die. Mask the “Happy” with washi tape. Stamp the “Easter” in Tuxedo Black Memento Ink as shown. Adhere to the card with Stampin’ Dimensionals. Mask the “Easter” with washi tape. Stamp the “Happy” in Tuxedo Black Memento Ink onto a piece of Whisper White Cardstock. Snip out with Paper Snips. Adhere with snipped-to-size Mini Stampin’ Dimensionals.
Stamp the lamb in Tuxedo Black Memento Ink onto Whisper White Thick Cardstock. Color with the following Stampin’ Blends: Light & Dark Smoky Slate, Light & Dark Real Red, Light & Dark Basic Black, and Color Lifter. Snip with Paper Snips and adhere as shown with Stampin’ Dimensionals.
Add Silver Metallic Pearls as shown.

Cut a piece of Whisper White Thick Cardstock to 4 1/4 x 11. Score and fold at 5 1/2.
Use a Paper Trimmer to cut a piece Whisper White Cardstock to 3 3/4 x 5. Adhere to a 3 13/16 x 5 1/16 piece of So Saffron Cardstock with Snail Adhesive. Zip through a die-cutting and embossing machine tucked inside the 3D Subtle Embossing Folder.
Use the Medium Daisy Punch to crop notches 3/4″ in from the left, on both top and bottom of the embossed pieces. Double wrap with Whisper White Solid Baker’s Twine that has been separated to two threads, securing with a bow.
Add elements of gingham So Saffron 6 x 6 Designer Series Paper to the card as shown. (left side 4 3/4 long, upper left Stitched So Sweetly 3/4 x 1, below sentiment Stitched So Sweetly 2 1/2 wide cut rectangle).
Crop a piece of Whisper White Cardstock with the largest Stitched Nested Labels Die. Cut to 2 5/8 long, adhere with Stampin’ Dimensionals.
Stamp the sentiment in Tuxedo Black Memento Ink onto a 3/4 x 2 3/4 piece of Whisper White Cardstock. Adhere to the card with Stampin’ Dimensionals.
Stamp the chick in Tuxedo Black Memento Ink onto Whisper White Thick Cardstock. Color with the following Stampin’ Blends: Light & Dark So Saffron, Light & Dark Cajun Craze, Color Lifter. Snip with Paper Snips and adhere as shown with Stampin’ Dimensionals.
Color Pearl Basic Jewels with a Dark So Saffron Stampin’ Blend. Adhere as shown.

Place an online store order valued at $50 or more (before shipping and tax), enter the host code PRGNTUKZ and you will earn YOUR CHOICE of ANY Current Item* valued at $10 $15 or less! (PLUS YOU GET A FREE SALE-A-BRATION ITEM!) *EXCLUDES 12X12 PAPER!
Click on the image below, it takes you right to my store so you can begin shopping NOW!

THREE IS BETTER THAN ONE! Become a part of Stampin’ Up!, The Hootenannies, & Mary Fish’s Pals Stamping Community!
- Purchasing the starter kit! Joining Stampin’ Up! includes access to exclusive Stampin’ Up! ideas and resources!
- Purchasing the starter kit and joining through me includes access to the Hootenannies AND the Stampin’ Pretty Pals Pals private Facebook groups and community. Immerse yourself at any level you like in daily stamping discussion, prizes, polls, ideas and inspiration, recognition, friendship, and fun!


- SALE-A-BRATION STARTER KIT BONUS! Jan. 3 – March 31, 2020 ONLY!
- For $99 (plus tax), you get:
- up to $125 in products of your choice. the only exceptions are Sale-A-Bration and host rewards products.
- a FREE new Mini Paper Cutter
- a FREE 6 x 6 paper sampler of the new designer series paper
- your choice of a FREE stamp set (any price)
- the kit ships free (another 10% savings)
- YAY DISCOUNT! Then save 20-25% on future purchases, with no obligation to buy, sell or stay active…do it for the discount and for you!

Have a Hoot-a-Riffic Day!


So adorable! Just perfect!
What a sweet set of cards! Your little touches of bling are understated perfection.