
")
Welcome to the July 2020 Artisan Blog Hop!
The Stampin’ Up! 2020 Artisan Design Team has so many amazing creations for you to see! I hope that you take the time to check out all 16 blogs! This blog hop will feature the Peace & Joy Bundle from the 2020 August – December Mini Catalog.
I am so humbled to be a part of this amazingly talented team of artists! Every month the projects WOW me and I hope that they WOW you too!

")
PEACE & JOY BUNDLE! One of my TOP BUNDLE PICKS from the 2020 August – December Mini Catalog. I was so excited to see the die-cut sentiments, I have been crossing my fingers that they would release a set like this for me to play with. As you will see with all Artisan’s projects, you can use the dies & stamps together, dies on their own, and stamps on their own…so versatile!

Use a Stampin’ Up! Paper Trimmer to cut a piece of Whisper White Thick Cardstock to 4 1/4 x 11. Score and fold at 5 1/2.
Create an ombre of color by using a Flat Brush Water Painter to apply the following Classic Inks to a piece of Fluid 100 Watercolor Paper: Pretty Peacock, Coastal Cabana, and Crumb Cake. Allow to dry completely.
Place several drops of Versamark Refill Ink onto a Clear Stamp Block. Pick up with a Water Painter or Paint Brush. Flick onto the Watercolor Paper. Cover with White Stampin’ Emboss Powder. Tap to remove the excess. Set with a Heat Tool.
Flick water onto the Fluid 100 Watercolor Paper. Let it sit for 30 seconds. Dab with a Paper Towel.
Cut the Watercolor Paper to 3 1/2 x 5 1/2. (Save the extra for the Mini Pizza Box shown below).
Use a Stampin’ Cut & Emboss Machine along with the Joy Dies to crop the largest “Peace” and ‘Joy’ Layers from the Watercolor Paper as shown.
Adhere the Watercolor Paper to the card base with Stampin’ Seal.
Adhere the Peace & Joy layers to the card base with Stampin’ Dimensionals.
Use the Joy Dies to crop the middle “Peace” and ‘Joy’ Layers in Whisper White Cardstock.
Adhere as shown with Mini Stampin’ Dimensionals.
Adhere a piece of Pretty Peacock Cardstock to an Adhesive Sheet. Use the Joy Dies to crop the top “Peace” and ‘Joy’.
Remove the Adhesive Sheet backing and adhere to the Whisper White Layer as shown.
Stamp the “AND” and “TO YOU AND YOURS” sentiments in Pretty Peacock Classic Ink onto a piece of Whisper White Cardstock.
Trim closely with Paper Snips.
Adhere with Mini Stampin’ Dimensionals.

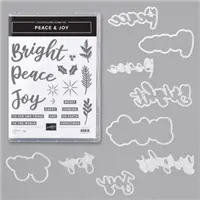
PEACE & JOY BUNDLE
The Peace & Joy Bundle includes the Peace & Joy Stamp Set and the Joy Dies.
PEACE & JOY PHOTOPOLYMER STAMP SET
Send your warmest Christmas wishes with handmade cards you make using the Peace & Joy Stamp Set. This set has the words to say what you’re feeling. Add any images from your favorite stamp sets to finish off your cards.* 19 photopolymer stamps
JOY DIES
Create die-cut words using the Joy Dies.These dies include the words “Joy,” “Peace,” and “Bright.” Use them on handmade cards, scrapbook pages, and other projects. They’re perfect for Christmastime but you’ll find uses for them all year long.* 9 dies * Largest die: 3-7/8″ x 1-7/8″
")

I have to say that Pretty Peacock is currently my FAVORITE color. Teal is a go-to of mine in all aspects and Pretty Peacock is just a really gorgeous shade of teal!
This card showcases the Peace & Joy Stamp Set on its own, which works well! I positioned all the stamps on a Stamparatus so I could create a drop shadow effect (detailed below), I just love the result.
Begin by using a Stampin’ Up! Paper Trimmer to cut a piece of Whisper White Thick Cardstock to 5 1/2 x 8 1/2. Score and fold at 4 1/4.
Adhere a 5 3/8 x 4 1/8 piece of Pretty Peacock Cardstock to the card base with Stampin’ Seal.
Smooch a 5 1/4 x 4 piece of Shimmery White Cardstock with Pretty Peacock Classic Ink. (you can see my smooching instructions here).
Use a Stampin’ Cut & Emboss Machine to crop the center of the Shimmery White Cardstock with the largest Stitched Nested Labels Die.
Adhere both to the card with Stampin’ Seal Adhesive.
Use a Flat Brush Water Painter to apply Pretty Peacock Classic Ink to a piece of Fluid 100 Watercolor Paper. Allow to dry completely.
Use a Water Painter to flick water onto the Watercolor Paper. Allow to sit for 30 seconds. Dab away with a Paper Towel.
Crop with the largest Stitched Nested Labels Die.
Position the four stamps on a Stamparatus. Stamp in Versamark Ink onto the Watercolor Paper. Cover with White Stampin’ Emboss Powder. Tap to remove the excess. Set with a Heat Tool.
Position on the Stamparatus slightly lower than the previous. Stamp again in Versamark Ink. Cover with Clear Stampin’ Emboss Powder. Tap to remove the excess. Set with a Heat Tool. (this creates the drop shadow effect).
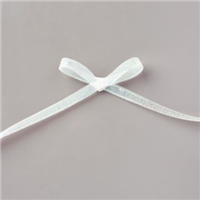
Staple a 2″ piece of folded Snowflake Splendor 1/4″ Ribbon to the upper left corner.
Add several Snowflake Adhesive-Backed Embellishments as shown.
")
")
Mine final project showcases the dies on their own. I just love how easy a Mini Pizza Box is to decorate and it is the perfect size to fit so many great gifts….Gift Cards, Cookies, Jewelry, and more.
Sponge Pretty Peacock Classic Ink onto a Mini Pizza Box prior to assembly. Set aside to dry.
Create an ombre of color by using a Flat Brush Water Painter to apply the following Classic Inks to a piece of Fluid 100 Watercolor Paper: Pretty Peacock, Coastal Cabana, and Crumb Cake. Allow to dry completely.
Place several drops of Versamark Refill Ink onto a Clear Stamp Block. Pick up with a Water Painter or Paint Brush. Flick onto the Watercolor Paper. Cover with White Stampin’ Emboss Powder. Tap to remove the excess. Set with a Heat Tool.
Flick water onto the Fluid 100 Watercolor Paper. Let it sit for 30 seconds. Dab with a Paper Towel.
Cut a 1 1/2 x 5 3/8 strip (from the excess of the card shown above). Note: You can use a 1 1/2 x 3 3/8 strip so that you do not have to wrap and cut slits in the paper as shown. It would have just as nice of an effect and much easier! Adhere to the Mini Pizza Box with Multipurpose Liquid Glue.
Double Wrap the Mini Pizza Box with Snowflake Splendor 1/4″ Ribbon, securing in the top-center with Mini Glue Dots.
Create 3″ loops (1 1/2″ long) and gather together to create the bow as shown. Adhere withe Mini Glue Dots.
Use the Joy Dies to crop the bottom ‘Joy’ Layer in Whisper White Cardstock.
Adhere as shown with Mini Stampin’ Dimensional.
Adhere a piece of Pretty Peacock Cardstock to an Adhesive Sheet. Use the Joy Dies to crop the top ‘Joy’.
Remove the Adhesive Sheet backing and adhere to the Whisper White Layer as shown.
Add several Snowflake Adhesive-Backed Embellishments as shown.
Which creation is your favorite? Do you have questions on a technique or design of my cards? Leave a comment or email me, I am more than happy to help!

Be sure to click on the links below to visit the rest of the Stampin’ Up! 2020 Artisan Design Team to see the entire blog hop line-up and to gain oodles of inspiration for the Peace & Joy Bundle!
The extremely talented Tammy Wilson, Stamp Paper Scissors is next in line. Be sure to check out the fabulous creations she has for you!

Click on the name of the Artisan below to visit their blog and see what amazing projects they have created to inspire you!
Caroline van der Straaten | Visit Her Blog
Helene den Breejen | Visit Her Blog
Lauren Alarid | Visit Her Blog
Manuela Geiswinkler | Visit Her Blog
Marine Wiplier | Visit Her Blog
Martha Groger | Visit Her Blog
Narelle Farrugia | Visit Her Blog
Nina Waldschmidt | Visit Her Blog
Rochelle Blok | Visit Her Blog

During the month of AUGUST, place an online store order valued at $50 or more (before shipping and tax), enter the host code NMNT7MXH and you will earn YOUR CHOICE of ANY Current Item** valued at $10 or less!
**EXCLUDES THE FOLLOWING ITEMS:
- ALL 12 x 12 Designer Series Paper
- NOTE: If you are ok with it cut to 6×6 pieces, then Designer Series Paper can be selected as your FREE item.
- ALL Large Grid Papers
- SORRY! They cost too much to ship!
NOTE: FREE Hoot Loot is shipped separately from your order. It should arrive mid-month following the month is earned.


Click on the image above, it takes you right to my store so you can begin shopping NOW!

THREE IS BETTER THAN ONE! Become a part of Stampin’ Up!, The Hootenannies, & Mary Fish’s Pals Stamping Community!
- Purchasing the starter kit! Joining Stampin’ Up! includes access to exclusive Stampin’ Up! ideas and resources!
- Purchasing the starter kit and joining through me includes access to the Hootenannies AND the Stampin’ Pretty Pals Pals private Facebook groups and community. Immerse yourself at any level you like in daily stamping discussion, prizes, polls, ideas and inspiration, recognition, friendship, and fun!

Have a Hoot-a-Riffic Day!


Wow I’m so flashed by your ombre color combination. Absolutely AMAZING Stesha. Its perfect
WOW I’m impressed. Your creations are simply stunning.
That ombre effect is so beautiful
Can you explain a little more about how you use the versamark refill ink on an acryllic block? What effect is it creating?
Thank you so much! I really love your techniques!
No problem at all!
I grab the Versamark Ink Refill from the acrylic block with a brush, then flick it onto the background to create splatter.
That is what is creating the white spots on the ombre background. It is allowing the White Stampin’ Emboss Powder to stick to it.
Does this make sense? Sorry, I am terrible at trying to explain what I am doing and make sense. 🙂
Thanks for asking the question!
This is a great grouping which shows off the bundle beautifully. The way you’ve used the Versamark refill is very clever.
Oh wow! These are true stunning in detail and amazing colours! LOVE THEM TO BITS!
as always, my fav…..blog! stunning projects, but your tutorials are right on & easy.
Love these cards. The ombre on the Peace and Joy is perfect.
Oh dear Stesha! such perfect and wonderful ombre effect and all those fantastic and inspiring projects! Amazing!